V-Bridge or Open Bridge
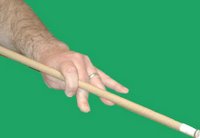
 The First Bridge in a persons toolbox should be the V or Open-Bridge. It is formed with your cue stick sliding on the top of your hand, in-between the channel formed by your thumb and pointer finger (see photo). Please notice that your hand is not completely flat on the table. Your hand should have an air pocket in the middle of your palm and the table. This forms a tri-pod effect using your two far fingers (pointer and pinky) as two legs of the tri-pod and the back of your palm is the third leg. Your hand is not lightly on the pool table, your fingertips should be firm on the table to the point of turning white from pressure placed on them.
A trouble area for most beginners is the channel between the thumb and pointer finger. By looking at the photo example you can see the stick crosses the pointer finger. The thumb is right up against the pointer finger which forms the channel. Too many people try to keep the pointer finger straight to the intended shot. This pulls the thumb away from the correct position and makes life hard. All you need to do is turn (pivot) your hand on the table so the pointer finger is crossing the stick line of aim (See Photo).
The First Bridge in a persons toolbox should be the V or Open-Bridge. It is formed with your cue stick sliding on the top of your hand, in-between the channel formed by your thumb and pointer finger (see photo). Please notice that your hand is not completely flat on the table. Your hand should have an air pocket in the middle of your palm and the table. This forms a tri-pod effect using your two far fingers (pointer and pinky) as two legs of the tri-pod and the back of your palm is the third leg. Your hand is not lightly on the pool table, your fingertips should be firm on the table to the point of turning white from pressure placed on them.
A trouble area for most beginners is the channel between the thumb and pointer finger. By looking at the photo example you can see the stick crosses the pointer finger. The thumb is right up against the pointer finger which forms the channel. Too many people try to keep the pointer finger straight to the intended shot. This pulls the thumb away from the correct position and makes life hard. All you need to do is turn (pivot) your hand on the table so the pointer finger is crossing the stick line of aim (See Photo).
 The First Bridge in a persons toolbox should be the V or Open-Bridge. It is formed with your cue stick sliding on the top of your hand, in-between the channel formed by your thumb and pointer finger (see photo). Please notice that your hand is not completely flat on the table. Your hand should have an air pocket in the middle of your palm and the table. This forms a tri-pod effect using your two far fingers (pointer and pinky) as two legs of the tri-pod and the back of your palm is the third leg. Your hand is not lightly on the pool table, your fingertips should be firm on the table to the point of turning white from pressure placed on them.
A trouble area for most beginners is the channel between the thumb and pointer finger. By looking at the photo example you can see the stick crosses the pointer finger. The thumb is right up against the pointer finger which forms the channel. Too many people try to keep the pointer finger straight to the intended shot. This pulls the thumb away from the correct position and makes life hard. All you need to do is turn (pivot) your hand on the table so the pointer finger is crossing the stick line of aim (See Photo).
The First Bridge in a persons toolbox should be the V or Open-Bridge. It is formed with your cue stick sliding on the top of your hand, in-between the channel formed by your thumb and pointer finger (see photo). Please notice that your hand is not completely flat on the table. Your hand should have an air pocket in the middle of your palm and the table. This forms a tri-pod effect using your two far fingers (pointer and pinky) as two legs of the tri-pod and the back of your palm is the third leg. Your hand is not lightly on the pool table, your fingertips should be firm on the table to the point of turning white from pressure placed on them.
A trouble area for most beginners is the channel between the thumb and pointer finger. By looking at the photo example you can see the stick crosses the pointer finger. The thumb is right up against the pointer finger which forms the channel. Too many people try to keep the pointer finger straight to the intended shot. This pulls the thumb away from the correct position and makes life hard. All you need to do is turn (pivot) your hand on the table so the pointer finger is crossing the stick line of aim (See Photo). Closed Bridge
 The more difficult of the two bridges is the Closed Bridge. Most people teaching pool push this bridge on beginners because it holds the cue stick in place better while shooting shots. I prefer teaching this after they have success with the Open Bridge.
Looping your pointer finger to your thumb forms the Closed Bridge. Your Cue Stick will then slide in the loop of your thumb and pointer finger. When you place your hand on the table, with the Cue Stick in your loop, your back of the palm touches the Table first (Your First leg of your Tri-pod). You then place your fingers on the table with the pinky and Middle finger as the second and third leg of the tri-pod. Your stick should cross over your middle finger a bit to give extra support to your cue stick. All this time your looped fingers should still be in place. Keep in mind not to have a loose loop around your cue stick. The object of this bridge is to have more of your hand in contact with the stick to insure a firm bridge while stroking the cue ball.
The more difficult of the two bridges is the Closed Bridge. Most people teaching pool push this bridge on beginners because it holds the cue stick in place better while shooting shots. I prefer teaching this after they have success with the Open Bridge.
Looping your pointer finger to your thumb forms the Closed Bridge. Your Cue Stick will then slide in the loop of your thumb and pointer finger. When you place your hand on the table, with the Cue Stick in your loop, your back of the palm touches the Table first (Your First leg of your Tri-pod). You then place your fingers on the table with the pinky and Middle finger as the second and third leg of the tri-pod. Your stick should cross over your middle finger a bit to give extra support to your cue stick. All this time your looped fingers should still be in place. Keep in mind not to have a loose loop around your cue stick. The object of this bridge is to have more of your hand in contact with the stick to insure a firm bridge while stroking the cue ball.  Most beginners will find this bridge uncomfortable, and develop some bad habits trying to shoot with it. So please keep in mind, The Bridge hand is only a tool to insure an accurate hit with the cue stick. If your bridge hand does not guarantee an accurate hit you might as well play one handed. Your results would be the same.
 Other Bridges
All other Bridge that you form will be a combination of the two bridges you just learned. Keep in mind a simple foundational rule. The Bridge hand should be STABLE (Not Moving)! With each unique circumstance the Stability of your bridge may very to a degree. Less stability means less certainty!


